Lately I have been obsessed with reading refashion blogs. I know it really doesn’t make much sense since I am doing the long-term travel thing and do not expect to have a “home” in the foreseeable future, which means I have no sewing machine to do any refashions. Yet obsessed I am.
My sewing kit on the road consists of a travel sewing kit from a hotel (i.e., needles and some thread) and a measuring tape (meant to measure clothing items in markets to better gauge if things will fit). In Thailand I picked up a few things like a pair of regular scissors (which I will probably have to discard when we take our next flight), a couple spools of thread (white and black) and a seam ripper (which I will also probably have to discard when we take our next flight). That’s it.
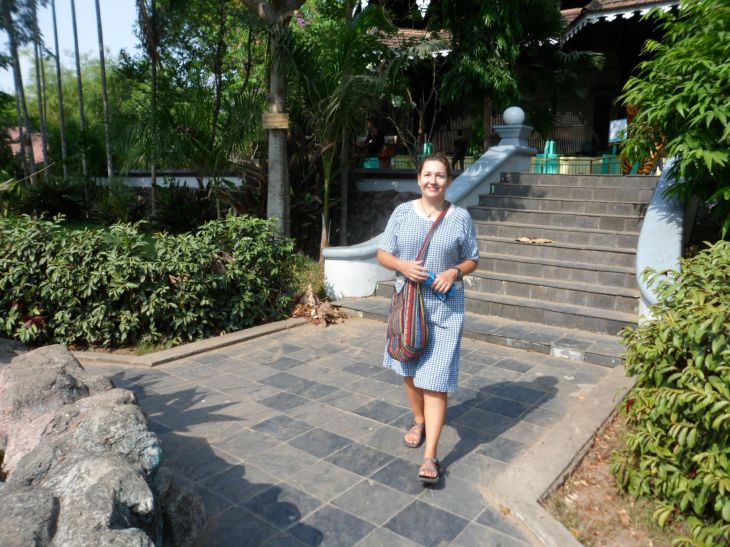
I bought this dress in Chiang Mai.

I only used my unofficial measuring tape when I saw it (i.e., my arm) and thought it would fit. It actually was way too big. Of course I forgot to take a picture of it on me showing that it was too big, so you’ll have to trust me on that. It looked like the dress originally had some ties that somebody cut off. Had they still been intact on the dress I may have been able to tie them and that would resolve the fit issue, but that was not to be.
Since I was so jealous of all of the refashions I kept reading about I decided to try to fix it myself while on the road.

I used the scientific method (not!) and put one of my other dresses on top of it to figure out how much to take it in. Then I just hand stitched along the line of the dress that fit. Since I suck sewing by hand (well, sewing in general really), the seam wasn’t very secure so I actually sewed it up three times.


It took a lot more time that it would have at home with a sewing machine. I actually thought it fit OK, not perfect but OK, and was pretty impressed with that part of the outcome.
If I was at home with a sewing machine I also would have shortened it a little bit and either shortened or just removed the sleeves. There was also the issue of what I would do with that extra fabric – I obviously had no way to serge, zig zag stitch, etc. and don’t even have pinking shears.

But I never dealt with the sleeves, length, or extra fabric because remember, this dress has a pretty big stain.

I sent it in with our laundry one time and that didn’t get the stain out, so I tried getting the stain out myself. We have a laundry bar that we use to do our hand washing so thought maybe that would work since we have used it to remove other stains on our clothing. I did a lot of scrubbing and let it soak overnight.
No luck, in fact I realized there were actually like three stains on the front of the dress and none of them came out or even faded.
Now if I were still at home, back when I had one anyway, I had various methods I would try to get stains out of vintage clothing and maybe one of them would have worked. But on the road I had no other options. Bottom line was I knew I wouldn’t like wearing a dress with stains all over it so I decided it just had to go so never dealt with the length, sleeves, etc.
The other issue was the yellowing. The collar, pocket detail, etc. were pretty yellowed. I scrubbed that as well but that also didn’t change after soaking overnight. Not really a deal-breaker by itself, but when combined with the other stains it was just too much.

Of course I did wear it once to take some photos in it. I know the Chacos sandals don’t look great, but come on, right now I only have two pairs of shoes and on the day we took these photos we had to walk about 30 minutes to the zoo, walk hours around the zoo, walk to get lunch, walk back to the hotel, etc. So Chacos were the practical, yet not stylish choice.
The material also turned out to not be very breathable and wasn’t all the comfortable on a really hot day.
So anyway, it was a fail: stains, yellowing, not good in heat.
Maybe next time I’ll do it better, or maybe I’ll just try harder to buy something that actually fits to begin with.
What’s your favorite refashion blog? I always need more reading material…….


Great article! Please be sure to check out my new fashion blog @ https://youngfashionableandfree.wordpress.com — would be greatly appreciated!
LikeLike
You have a great blog!
LikeLiked by 1 person
Thanks!!
LikeLike
We live and learn, but thrifting makes it cheap 😉 I don’t follow too many refashioning-only blogs (could use the recommendations myself!), but my advice is to keep a bit of chalk on hand to mark your lines (since you can just rub it off if you do it vigorously enough) and keep practicing making your stitches as small as possible. Also, maybe you could try hand stitching a French seam? I’m sure it would be crazy hard to do when your not too comfortable hand stitching (and let’s be honest, my first pair of re-fashioned pants don’t have the seams cut either.) I’ve also been using what’s called a double stitch to finish my seams, which might work, but I’m sure if you tried either of those methods you’d probably be a pro at hand stitching by the end of it.
LikeLike
I really like the chalk idea since it is small and won’t take up much space. I know I really need to work on making my stitches closer together, you would think all of that stitching would have yielded some improvement but it didn’t. Part of my problem is probably that I don’t really know much about sewing – I didn’t even know what a French seam was! I went and looked it up and it probably would have been hard, but it would have worked well on the dress and is something good to learn – I will definitely have to try that next time, thanks for the idea!
LikeLike